Placements
Paid Placements help you drive clicks by placing your product in prominent category and competitor listing positions. In this section, you'll go through a complete guide of selecting placements, configuring destination URLs and how these help you in driving more traffic.
Create a New Paid Placement
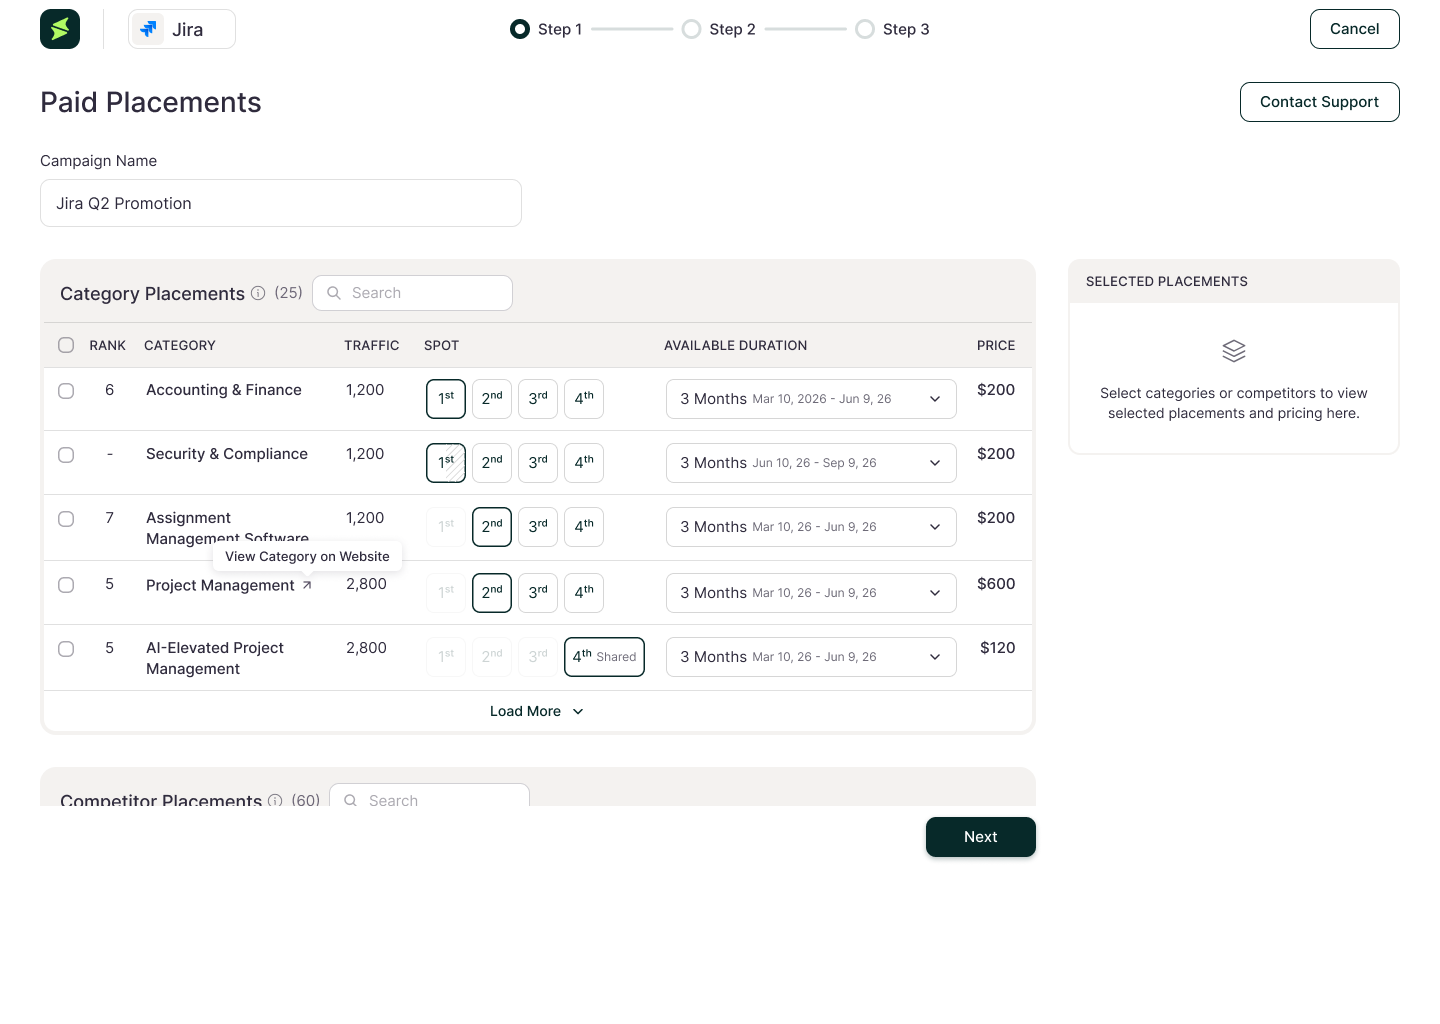
Upon clicking the Buy Placements button on the landing page, the system takes you to the placements creation page. You can add multiple paid placements for both category and competitor positions.
Steps for Category Placement(s)
- Review or edit the campaign name according to your choice.
- Select the preferred placements from the category list.
- Choose from the available spot positions, i.e. 1st , 2nd , 3rd, and 4th. The 4th placement will always be a shared spot.
- Click on the Available Duration dropdown and choose from the options provided, i.e. 3 Months, 6 Months, 9 Months, and 12 Months.
Once a spot is booked for a selected duration, it remains unavailable for that time frame. If the same spot is already booked, you can schedule the placement for the next available duration.
- Review the payment against the spot.
- Review the Selected Placements panel on the right. If you want to cancel any selected placement, hover over the placement and you will see X icon. Click the icon to cancel the specific placement.
Steps for Competitor Placement(s)
- Select the competitor's placements you want to purchase.
- Choose the available duration for each competitor's placement, i.e. 1st shared.
- Review the price for each selected placement.
- Review the Selected Placements panel on the right. If you want to cancel any selected placement, hover over the placement and you will see X icon. Click the icon to cancel the specific placement.
- Once done, Click Next to continue.
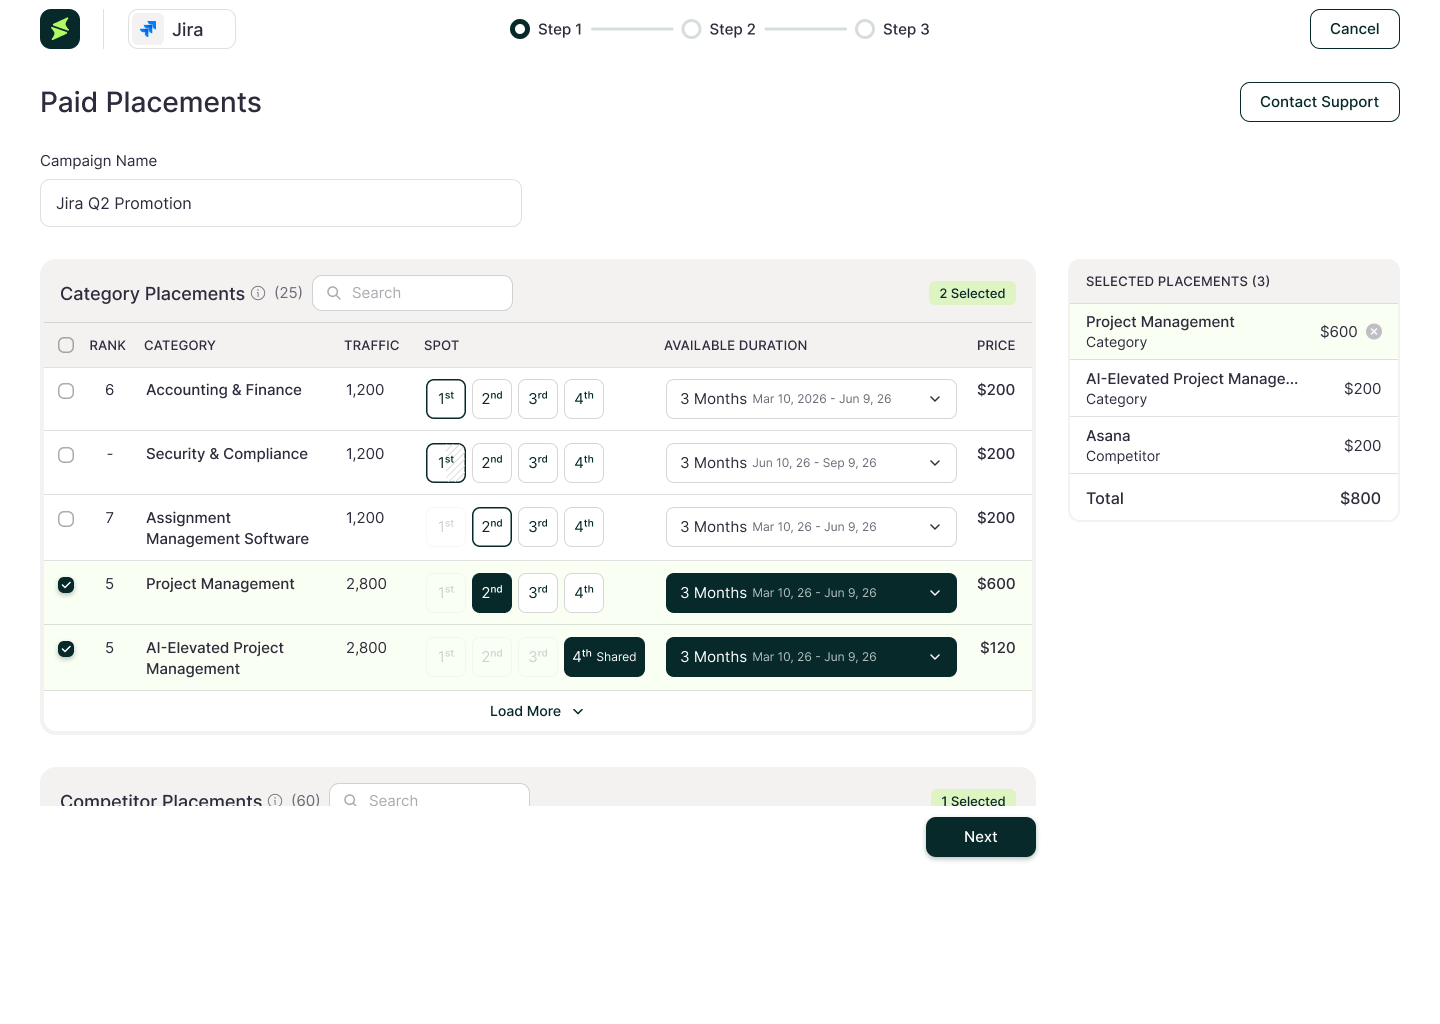
You can select placements from both Category Placements and Competitor Placements, or choose placements from only one section, based on your campaign requirements.
Category and Competitor Section Details
Field | Description |
|---|---|
Campaign Name | Displays the name of the campaign. You can edit the name according to your preference. |
Categories/ Competitors | Displays the categories/competitors' names. You can select multiple categories/competitors. |
Traffic | Shows the available traffic volume for that category/competitor. |
Spot | Displays options of the placement position of category and competitor. |
Price | Shows the cost of the selected category/competitor placement. |
Search | Helps you find a specific category/competitor. |
Available Duration | Select the time for the selected placement spot.
|
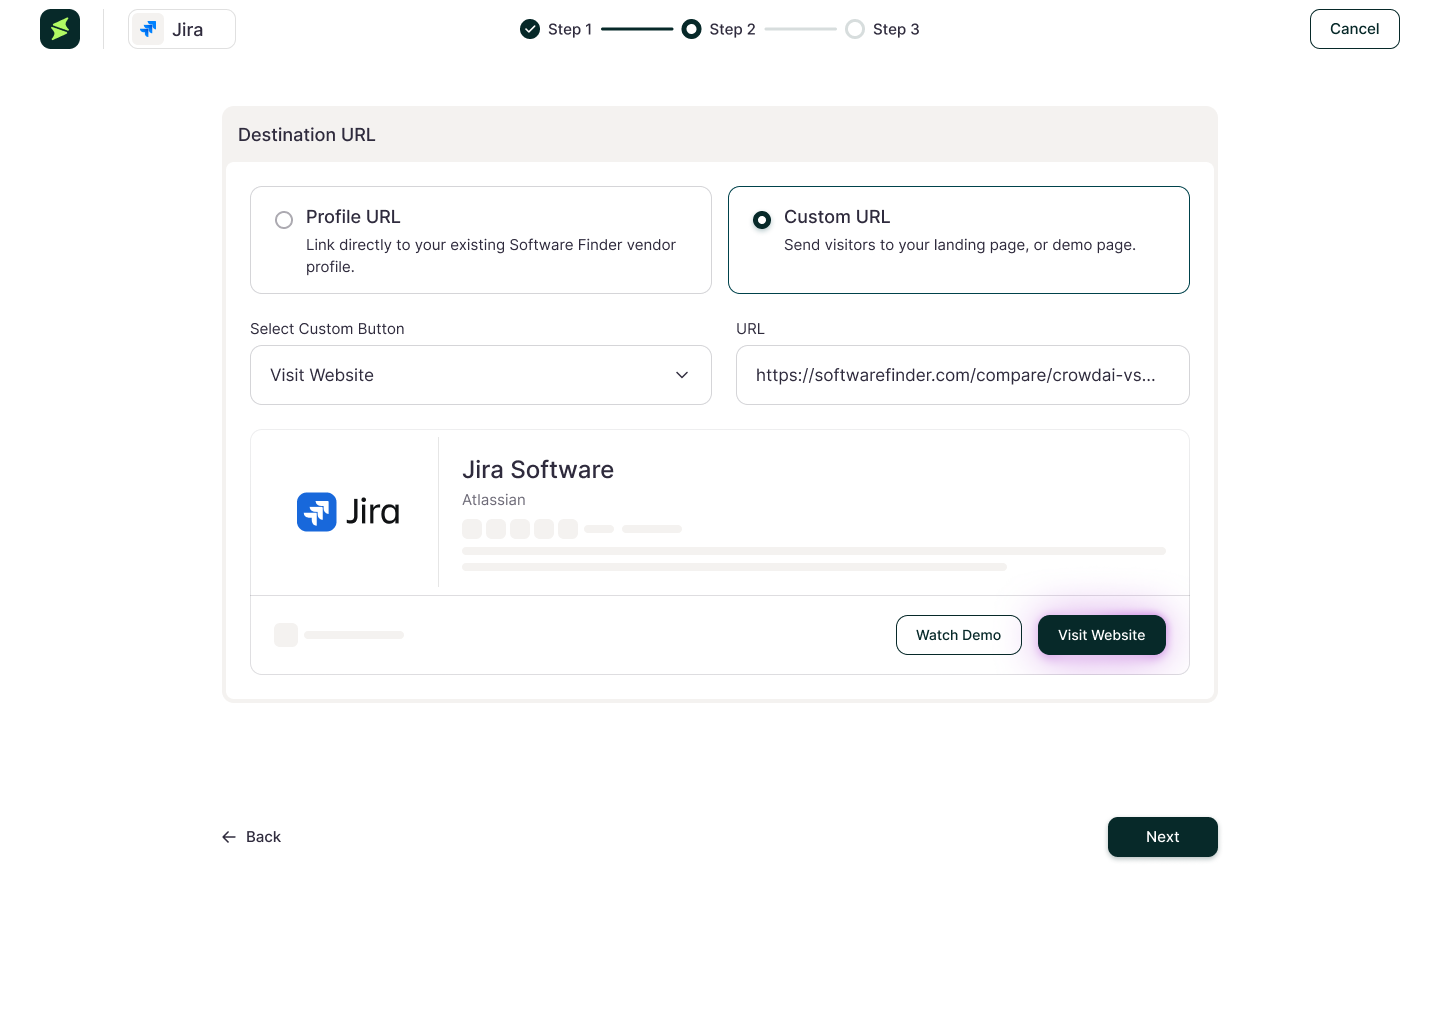
Select a Destination URL
The Destination URL screen displays a radio button for you to select the path of the URL.
-
Choose one of the available destination options:
- Profile URL - Select Profile URL to send traffic directly to the existing link already added to your Software Finder vendor profile.
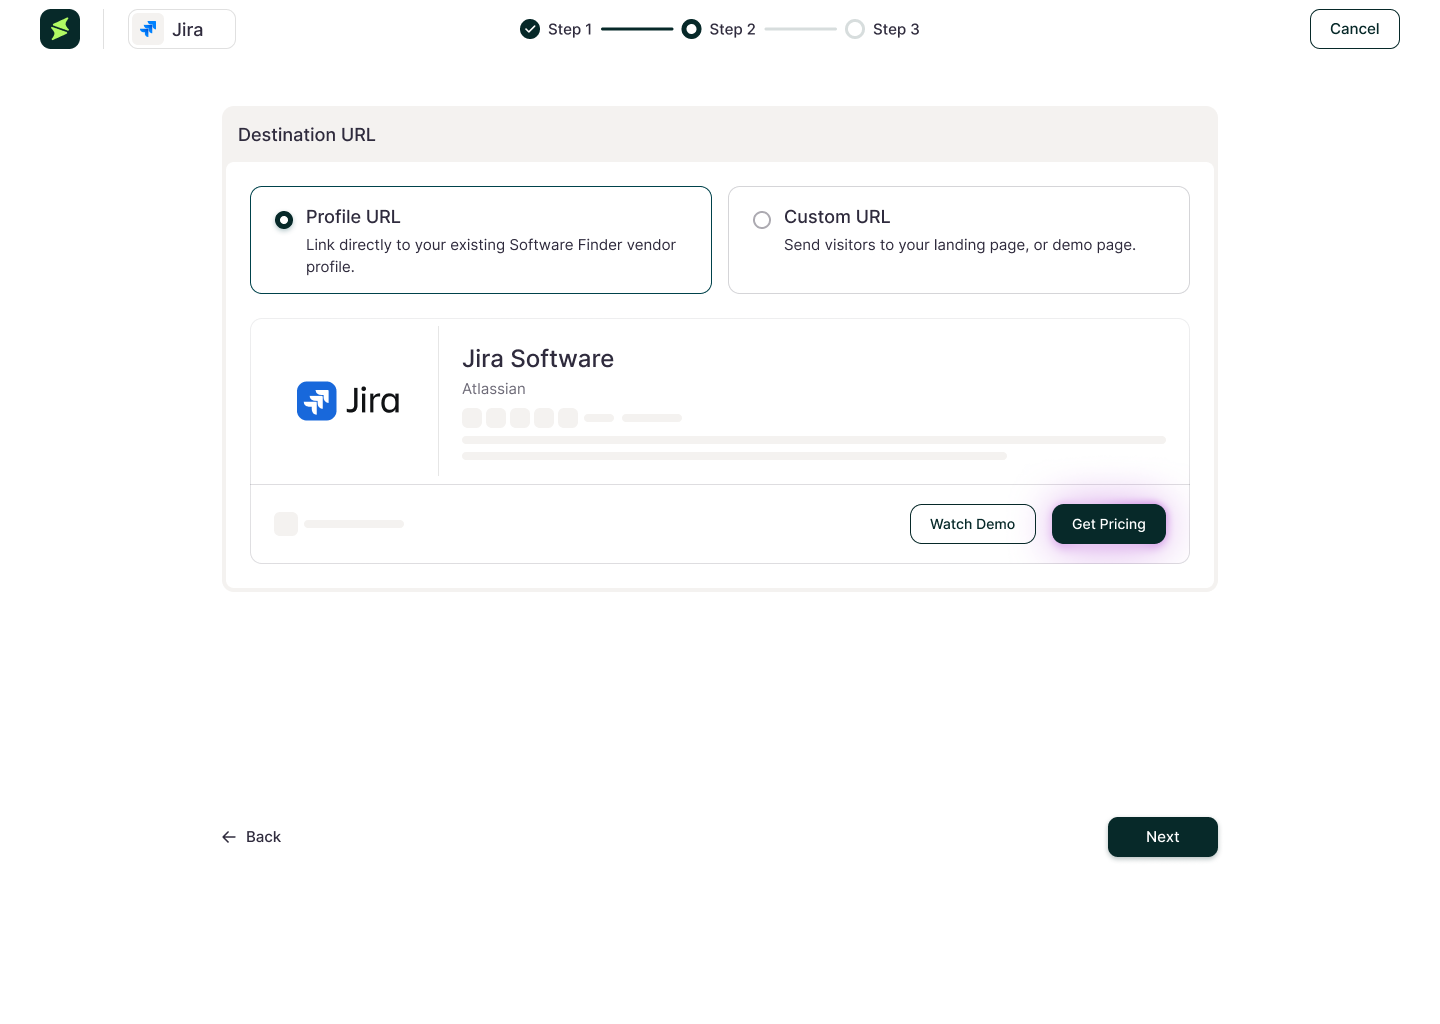
- Custom URL - Select Custom URL to add a custom destination link and choose the call-to-action button from the Custom Button Text dropdown.
-
Click Next to continue.
Review and Complete Payment
Upon clicking the Next button, the system directs you to review the payment page. It depicts the following details:
-
Order Summary - Gives a final overview of the purchase for the category and competitor placement.
-
Destination URL - Shows the selected call-to-action or destination type for the placement.
-
Total Due Today - Shows the total payment amount for all selected placements.
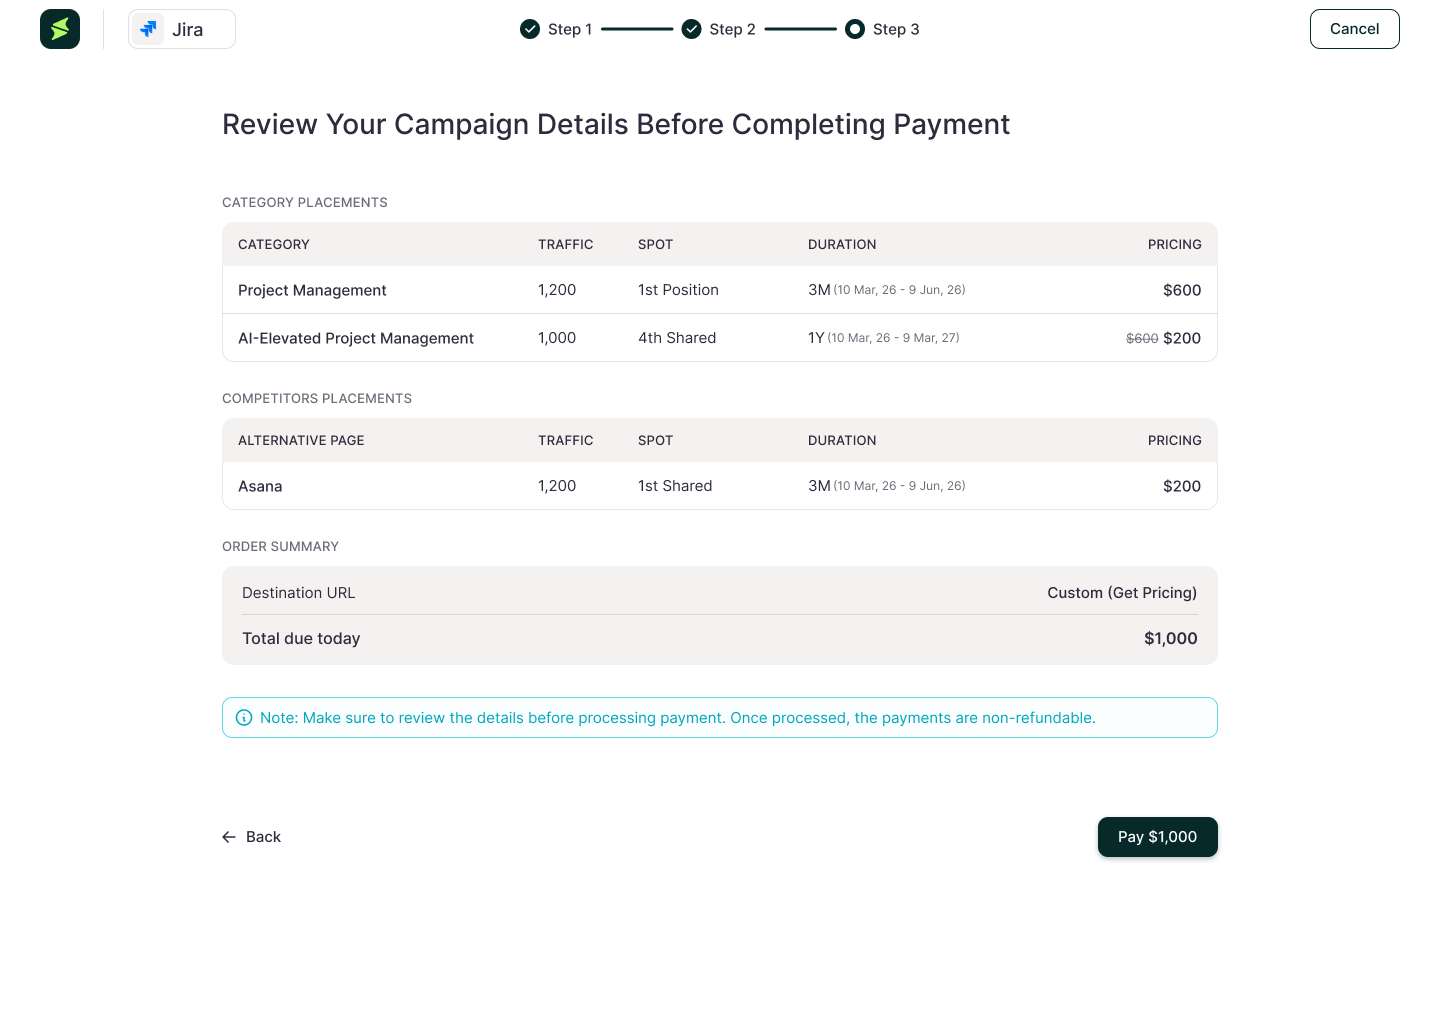
After you review the details and click Pay, the system processes the payment and completes the placement order.
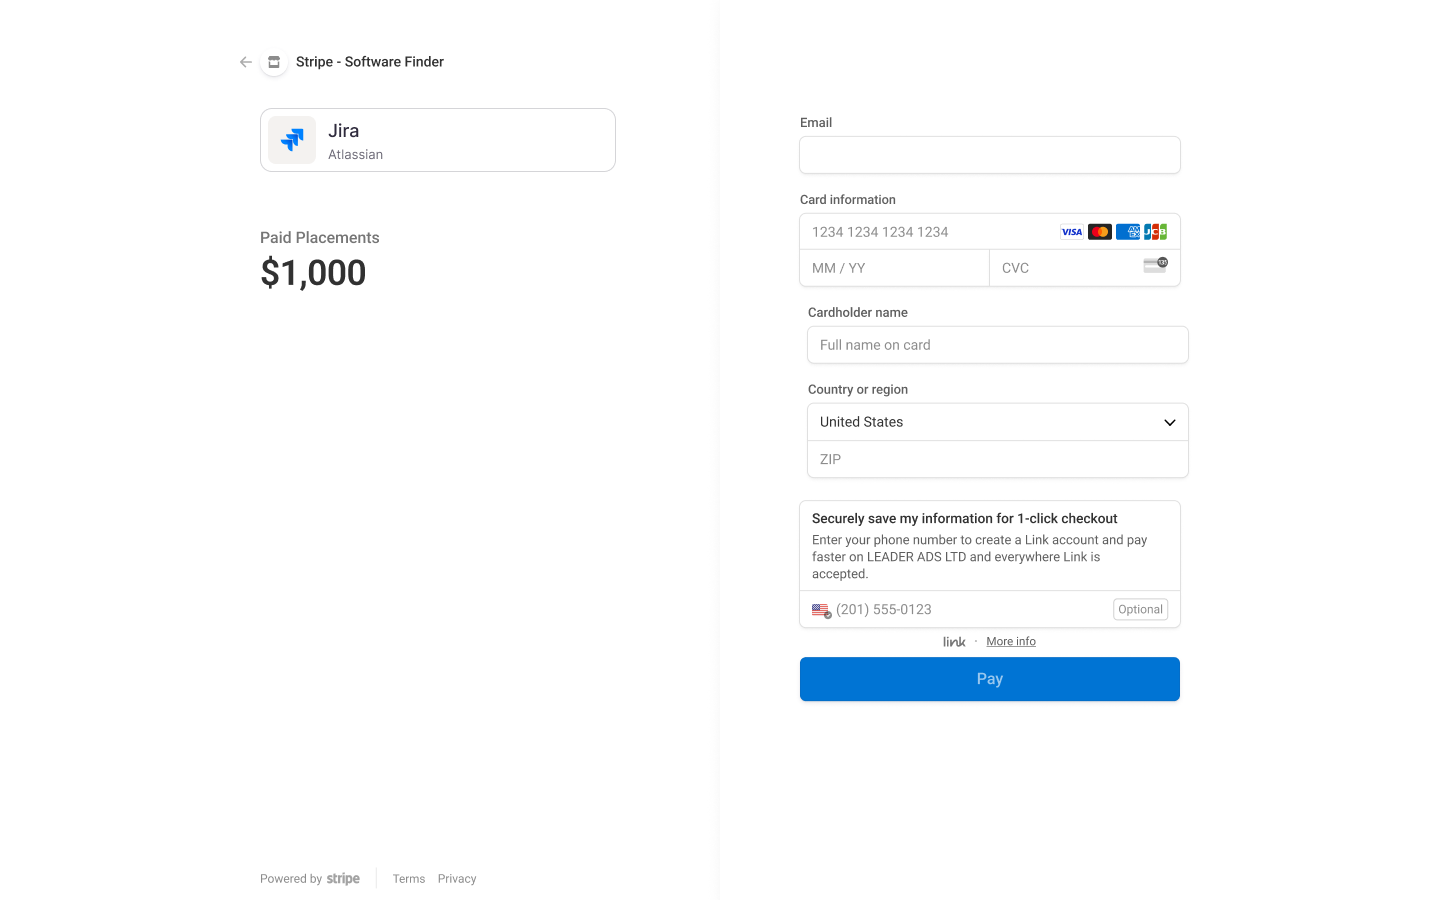
Ensure that all your details are correct before payment, as all transactions are final and non-refundable.
Placements Screen
The Placements screen appears when you select a product with ongoing placements. This screen displays the details of all campaigns linked to the selected product, including placement status, performance metrics, and payment summary.
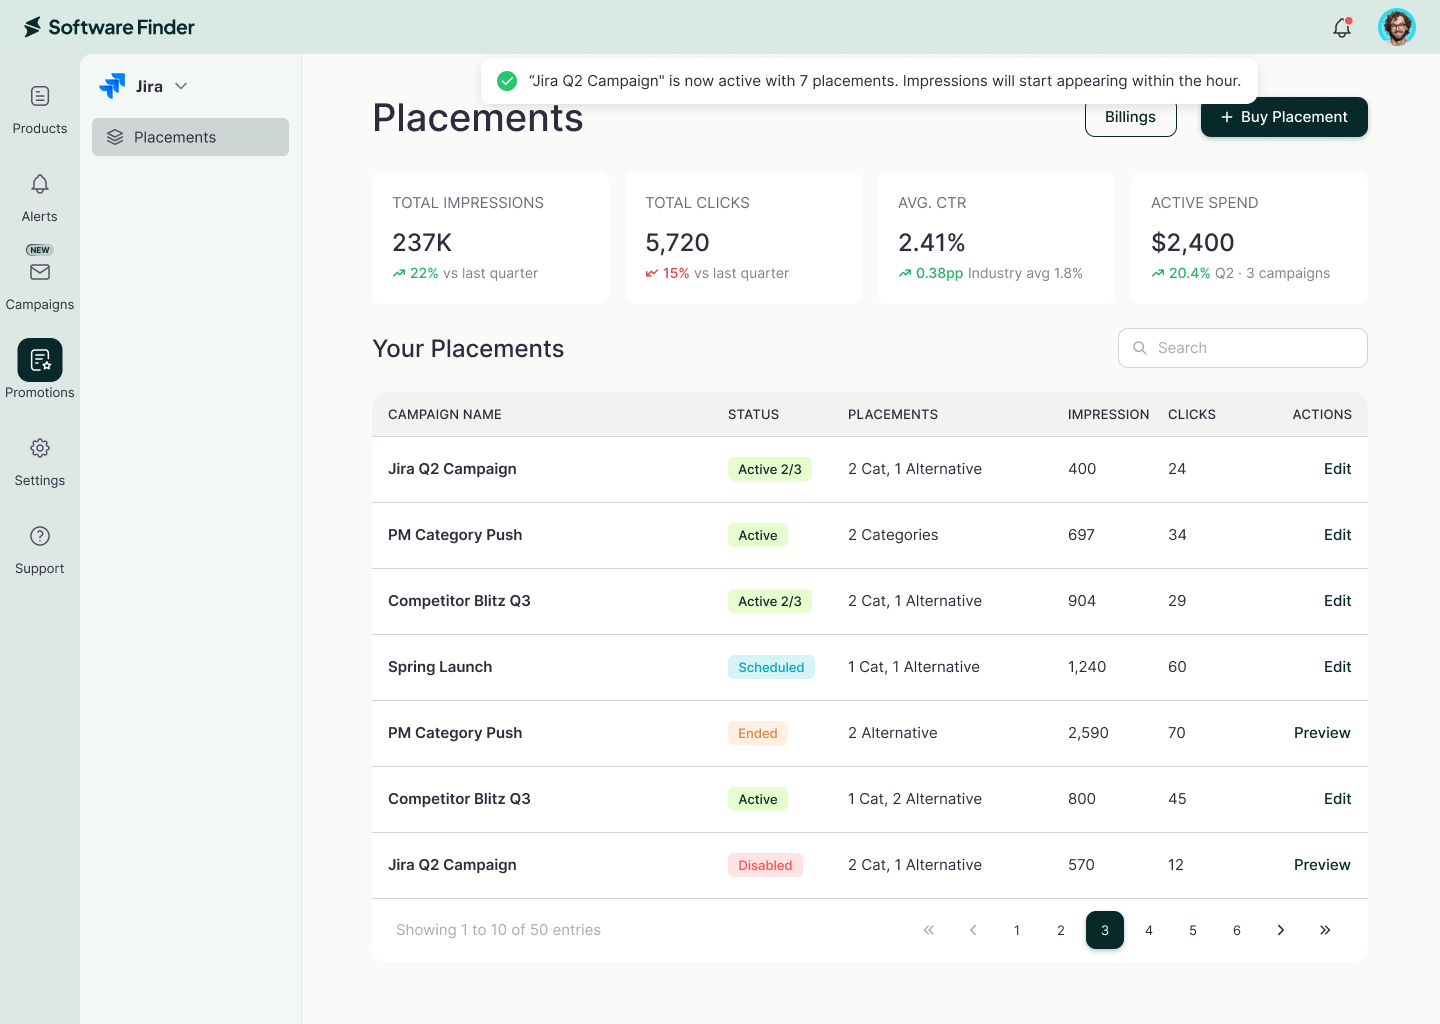
After you complete a payment, the system also redirects you to this same Placements screen and displays the newly purchased campaign on the Your Placements table.
Performance Cards
The performance cards at the top show stats for the current campaign only.
-
Total Impressions - Shows how many times your promoted placements appear to users.
-
Total Clicks - Shows how many users click on your promoted placements.
-
Avg. CTR - Shows the average click-through rate for your placements.
-
Active Spend - Shows the current active spend assigned to your placements.
Your Placements Table Section
Your Placements table lists all placement campaigns for the selected product.
-
Campaign Name - Displays the name and date of the placement campaign.
-
Status - Shows the status of the campaign, i.e. Active, Scheduled, Disabled, Ended.
-
Placements - Shows the number of category and alternative placements included in the campaign.
-
Impressions - Displays the number of times the campaign placements appear.
-
Clicks - Displays the number of clicks the campaign receives.
-
Actions - Lets you edit the selected placement campaign. You can only edit the destination URL for active and scheduled campaigns.
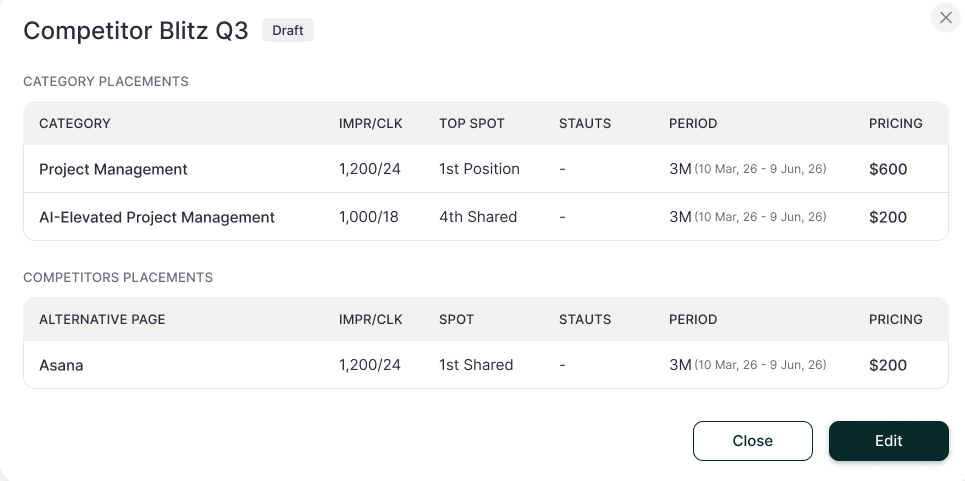
View Campaign Details
The Campaign Details modal appears when you click on a campaign from Your Placements table. Use this modal to review all placements included in the selected campaign. Click Edit to update the campaign's destination URL settings. You can only edit the destination URL from this screen. Further, you can click the ↗ sign to visit the relevant category page.
Billing
The Billing screen appears when you select Billing from the product navigation menu. Use this screen to review payment history, view placement transactions, download receipts, and update the payment method.
Payment History Table
The Payment History table displays all payment records linked to the selected product.
-
Date - Shows the payment date.
-
Amount - Shows the payment amount.
-
Transaction - Shows the transaction type, such as Placements.
-
ID - Shows the transaction ID for the payment.
-
Receipt Icon - Opens the receipt for the selected placement payment.
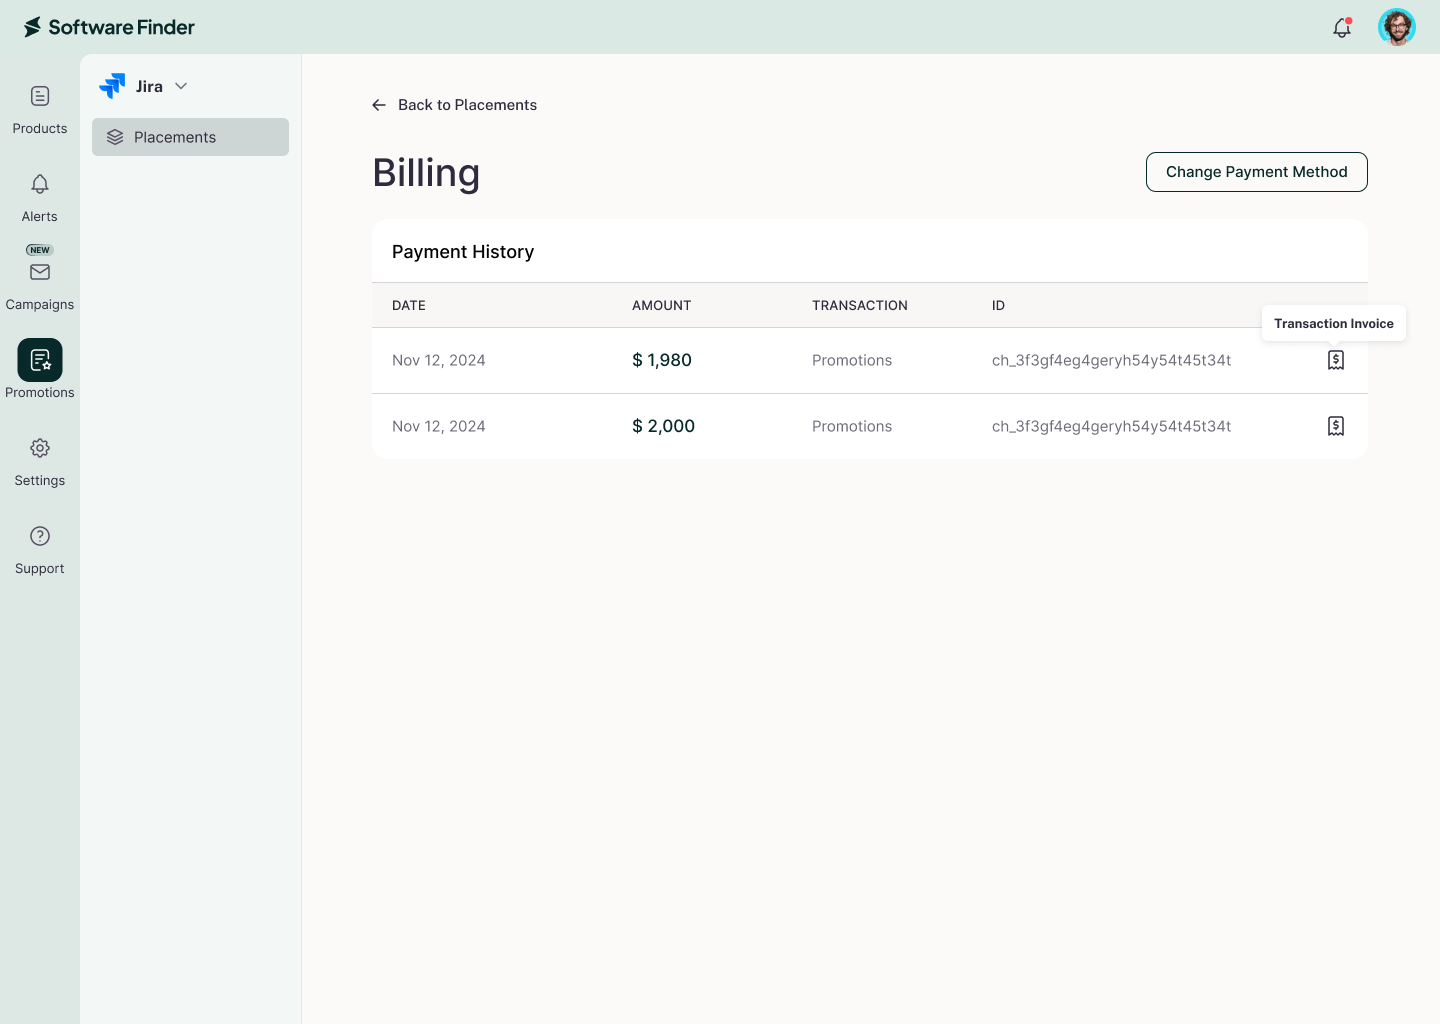
Change Payment Method
Upon clicking the Change Payment Method button, you update the payment method connected to your account.
FAQs
Do I need to set up billing before creating a campaign?
Yes. You must have a valid payment method on file (or provide one during checkout) before completing a campaign. The system redirects you to secure payment if no card is already saved.
What happens if I schedule a campaign for the future?
Your campaign remains in Scheduled status until the start date. On that date, it automatically transitions to Active, and your placements go live. You can edit the destination URL while the campaign is scheduled.
Can I edit a campaign after it goes live?
Yes. You can change the destination URL (Profile URL vs. Custom URL) at any time while a campaign is Active or Scheduled. You cannot modify placement selections once the campaign is activated.
What is the difference between Category and Competitor placements?
Category placements display your product within category listings (e.g., "Project Management"), allowing users to browse that category to see you. Competitor placements display your product on competitor product pages, capturing users evaluating alternatives.
How is my campaign charged?
Each placement has a fixed 3-month price determined by its type, position, and category/competitor of traffic. Your total cost is the sum of all selected placements. You are charged once upon campaign submission; the payment is non-refundable.
Why was my campaign marked as Disabled?
An administrator may have disabled your campaign or one of its placements for compliance, performance, or inventory reasons. Contact support for clarification and possible re-activation options.
When do impressions and clicks start accruing?
Impressions and clicks begin accruing once your campaign transitions to Active, and placements go live. This typically occurs within one hour of the campaign's start date.
I purchased the 4th spot, but I’m unable to see it. Could you please explain why?
Apparently, the 4th spot is a shared position used by multiple vendors, so it may become visible after a few refreshes or after some time.