Profile Listing Management
This guide provides step-by-step instructions to help you manage and update different sections of your profile on Vendor Portal A well-maintained profile improves your credibility, engagement, and conversion rates by presenting the most accurate and appealing version of your profile. Upgrade to Premium to unlock advanced features and get even more out of your profile. Ready to level up? Upgrade to Premium today.
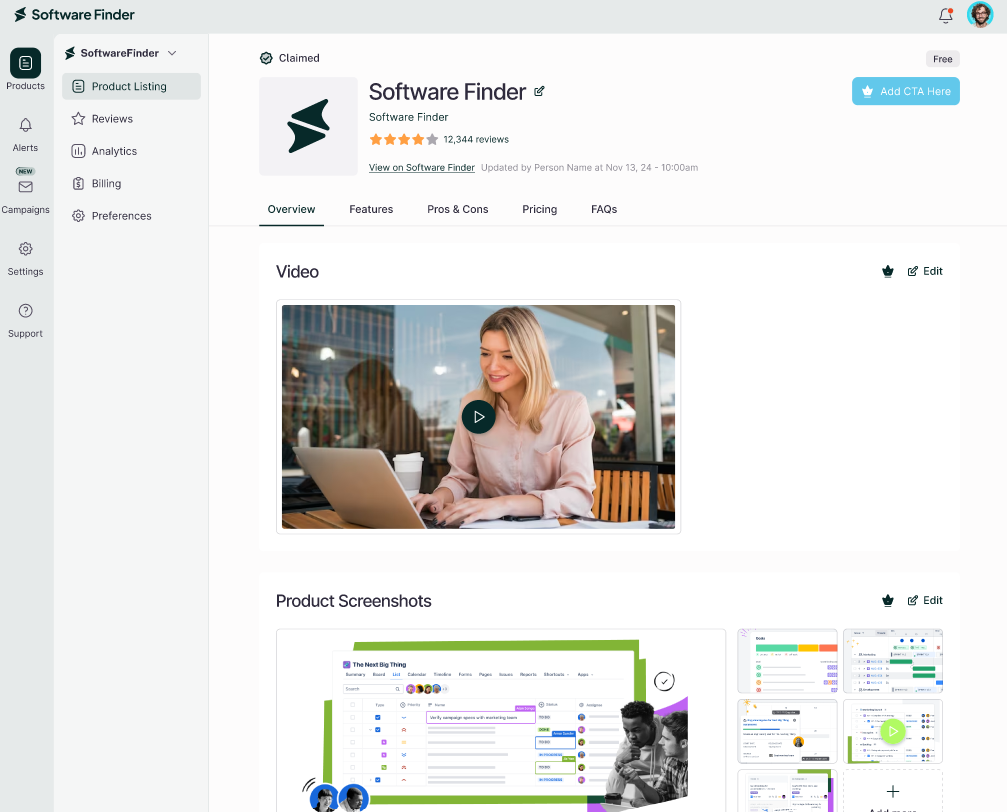
Profile Picture & Custom CTA
Enhance your brand presence and drive user engagement by updating your logo and adding a call-to-action button.
Clicking Save alone does not publish your changes. Always click Publish Changes at the top of the screen.
Update Profile Picture
- Click the Edit icon on your current logo.
- Upload a new image using Browse Image or drag-and-drop.
- Use the Zoom Bar (+/–) to fit the image properly and click Save to save the update.
- Click Publish Changes at the top of the screen to make it live.
Custom CTA Button (Premium)
- Click the Edit icon on the CTA button.
- Select a Button Title from the dropdown menu.
- Enter your Website URL.
- Click Save, then click Publish Changes at the top of the screen.
Overview
This section gives users a snapshot of what your profile does. Keeping it fresh and accurate ensures a strong first impression.
Add Profile Video (Premium)
- Click the Edit icon in the Video section.
- Enter your YouTube video URL in the input field.
- Click Save to embed the video and then click Publish Changes at the top of the screen.
Add Profile Screenshots (Premium)
- Click the Edit icon in the Screenshots section.
- Upload one or more images using Browse Image or drag-and-drop.
- Click Save to add the screenshots and then click Publish Changes at the top of the screen.
Update Profile Specifications
- Click the Edit icon in the Specifications section.
- Toggle the specs relevant to your profile and Click Save button to save changes.
- Click Publish Changes to apply the update.
Update Profile Description
- Click the Edit icon next to the Description section.
- Make changes using the content editor and click Save to save updates.
- Click Publish Changes to make it live.
Features
Use this section to highlight key functionalities that set your product apart.
Add New Feature
- Click + Add New Feature at the end of the list.
- Enter the Feature Title and Feature Detail in the popup.
- Click Save, then Publish Changes.
Edit Existing Feature
- Click the Edit icon, make updates, and click Save.
- Click Publish Changes to go live.
Delete a Feature
- Click the Edit icon next to the feature.
- Click the Trash icon to delete it and confirm.
Pros & Cons
Control the visibility of this section to help users better evaluate your software.
Show or Hide Pros and Cons (Premium)
- Navigate to the Pros and Cons section.
- Toggle the Show Pros and Cons switch:
- On – Section is visible to users.
- Off – Section is hidden from your public profile.
- Click Publish Changes to save the visibility setting.
Pricing
This section allows Premium profile owners to manage detailed pricing plans, helping buyers understand the value of each offering.
Add New Pricing Plan (Premium)
- Click + Add More Pricing.
- Fill in the Plan Title, Subtitle, Monthly Price, Price Unit, and What’s Included.
- Click Save, then Publish Changes.
Edit Pricing Plan (Premium)
- Click the three-dot icon on the pricing card.
- Select Edit and update the necessary fields.
- Click Save, then Publish Changes.
Delete Pricing Plan (Premium)
- Click the three-dot icon on the pricing card.
- Select Delete, then confirm the action.
FAQs (Profile Section)
Use this section to proactively answer common questions from potential users.
Add FAQ
- Click + Add New Question.
- Enter the Question and Answer in the popup.
- Click Save, then Publish Changes.
Edit FAQ
- Click the three-dot icon next to the question.
- Select Edit, make changes, then Save and Publish Changes.
Delete FAQ
- Click the three-dot icon next to the question.
- Select Delete and confirm.
Alternatives
Display or hide comparable software to give users additional context or maintain focus on your own Profile.
Show or Hide Alternatives (Premium)
- Navigate to the Alternatives section.
- Toggle the Show Alternatives switch:
- On – Alternatives are displayed on your profile.
- Off – Alternatives are hidden.
- Click Publish Changes to live the changes.
Best Practices
- Always click Publish Changes after editing to apply updates to your live profile.
- Review and update your profile regularly to reflect new features, pricing, and brand assets.
- Premium users benefit from added customization like videos, CTA buttons, screenshots, and pricing tools.
FAQs
Do I need a premium subscription to access all profile features?
Yes. Features like CTA button, videos, screenshots, pricing plans, and additional customization options are available only to Premium profiles.
What happens if I forget to click ‘Publish Changes’?
Any changes you make will not be visible publicly until you click Publish Changes. Always make sure to finalize your updates.
What file formats are supported for logo and screenshots?
JPG,and PNG formats are supported. Maximum size limits may apply for uploads.