
How to Choose the Best Product URL for Your Listing

· 2 min read

Your Product URL plays a small but important role in how users discover and trust your product on Software Finder. Most of the URL is created automatically based on the category you select. The only part you customize is the final segment. This last section becomes your product’s unique identifier on the platform, so choosing it carefully helps create a clean and professional link.

Product URL Guide

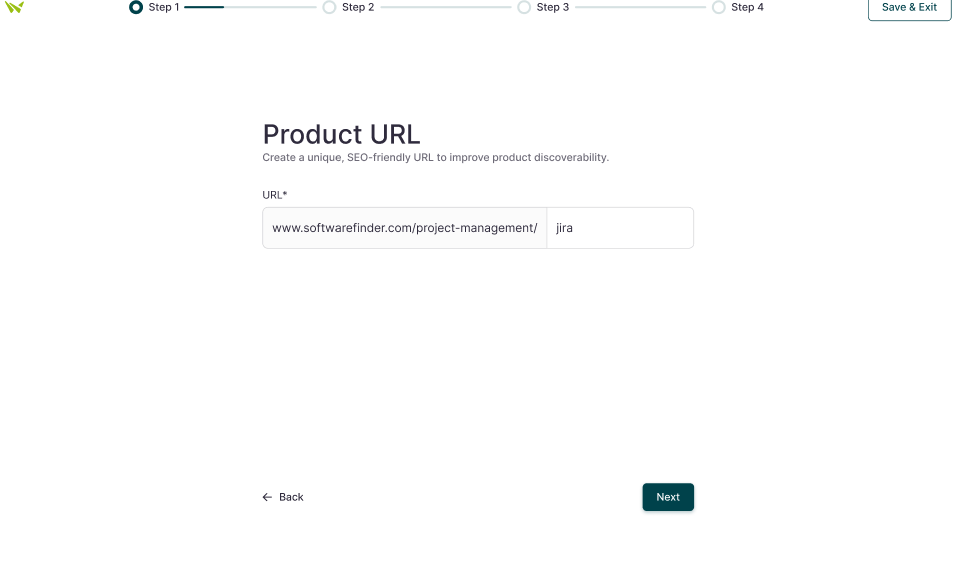
Here’s how to enter the right ending for your Product URL.


Step-by-Step Guide: Choose the Right Product URL Ending

Use your exact product name

The ending of the URL should match your product name. This keeps your listing consistent and makes it easy for users to recognize your brand at a glance.

Example:
softwarefinder.com/project-management/flowdesk


Keep the format simple

Stick to lowercase letters and avoid spaces or special characters. If your product name has two words, use a hyphen to keep it readable.

Example:
softwarefinder.com/office-management/office-manager


Avoid adding extra keywords

The last part of the URL should only contain your product name. Adding marketing words like “best,” “top,” or “tool” makes the link look cluttered and less trustworthy. Keeping it simple helps your URL stay clean and professional.

Example:
softwarefinder.com/medical-software/clinicpro


Double-check the final segment

Because this part becomes your public product link, take a moment to check the spelling before you continue. A clean ending makes your URL clear and professional.


Conclusion

Choosing the right Product URL is simple, but it has a meaningful impact on how users find and view your listing. Since the category and structure are generated automatically, your focus is only on the last part of the URL. Keep it clean, keep it accurate, and keep it aligned with your product name. A well-chosen final segment helps your Software Finder page look polished, trustworthy, and easy to discover.

How to Select the Right Tags to Improve Product Visibility

· 2 min read

Tags help users and search engines understand what your product does. On Software Finder, selecting the right tags can improve your visibility and bring more relevant users to your product page. Tags act like keywords that describe your software’s category, features, and purpose, so choosing them carefully can make a big difference in how easily users find you.

Product Tags Guide

Step-by-Step Guide: Choosing the Right Tags

Pick tags that match your core features

Choose tags that reflect what your product actually offers. Focus on the main features and functions users would search for when looking for software like yours.

Example:
A project management tool might use tags such as: task management, project planning, team collaboration


Select tags that match your correct category

Make sure your tags align with the industry or category your product belongs to. This helps direct your listing to the right audience and increases the chances of appearing in relevant searches.

Example:
A healthcare software tool might use tags such as: EMR, practice management, appointment scheduling


Think like your users

Use tags that your target audience would actually search for. Put yourself in their place and consider the terms they would type when looking for a solution like yours.

Example:
If users search for “invoice generator,” choose a tag like invoicing, not technical internal terms.


Conclusion

Selecting the right tags helps your product show up in the searches that matter. Focus on tags that match your product’s real features, stay aligned with your category, and choose terms users are most likely to look for. A clean and accurate set of tags improves your visibility on Software Finder and makes it easier for the right audience to discover your product.

How to Write SEO Meta Titles and Descriptions That Work

· 2 min read

Your Meta Title and Meta Description help shape how your product appears in search results and on Software Finder. These two fields introduce your software before users even click, so writing them clearly can increase visibility, improve clicks, and create a strong first impression.

SEO Meta Guide

Step-by-Step Guide: Writing Effective Meta Titles and Descriptions

Keep your Meta Title clear and focused

Your Meta Title should include your product name and its main purpose. Keep it short, direct, and easy to understand. Avoid long phrases or keyword stuffing. A simple, clear title performs best.

Example:
FlowDesk | Project Management Software for Teams


Write a strong Meta Description

Your Meta Description should give a quick overview of what your product does and who it helps. The ideal length is 130 to 180 characters. This range ensures your text is informative while still displaying fully in search results.

Example:
FlowDesk helps teams plan projects, track tasks, and stay organized. Built for businesses that want simple and effective project management.


Conclusion

A well-written Meta Title and Meta Description help your product stand out and attract the right visitors. Keep your title focused, write your description within the recommended 130 to 180 character range, and highlight your product’s real value. With these simple steps, your Software Finder listing becomes more visible, more appealing, and easier for users to understand.

Product vs Service Profiles on Software Finder

· 3 min read

When using Software Finder, you’ll come across two types of listings: Product Profiles and Service Profiles. Both help businesses connect with the right technology, but they serve different purposes. Product Profiles represent software products, while Service Profiles represent companies that provide technology services such as implementation, consulting, or development. Understanding how they differ helps you choose the right way to showcase your business or find what you’re looking for.


What Is a Product Profile?

A Product Profile lists a specific software application that users can buy, try, or subscribe to. It’s designed for software vendors who want to highlight the features and benefits of their products and reach potential buyers.

What’s Included

  • Overview: A short summary of the software and its use cases
  • Features: Core tools, modules, and functionalities
  • Pros and Cons: Insights from real users
  • Reviews: Verified customer ratings and feedback
  • FAQs: Answers to common questions about pricing or setup
  • Alternatives: Related products for comparison
  • Action Buttons: Watch Demo, Get Pricing, or Claim This Profile

Example:
Listings like Zoho CRM, QuickBooks Online, or Asana are Product Profiles. Each includes detailed descriptions, pricing, and reviews to help buyers evaluate the software before making a decision.


What Is a Service Profile?

A Service Profile showcases a service-based company that provides software-related services. These companies don’t sell software directly instead, they help businesses implement, customize, or manage the tools they use.

What’s Included

  • Overview: Company background and services offered
  • Industries Served: Sectors the company specializes in
  • Client Reviews: Testimonials and ratings from clients
  • Portfolio or Resources: Case studies or project examples
  • Action Buttons: Get a Quote, Download Portfolio, or Claim This Profile

Example:
Companies like Systems Limited, Accenture, 10Pearls, and Wipro would have Service Profiles. These pages showcase their expertise in IT consulting, software development, and digital transformation.


Product vs Service Profile at a Glance

AspectProduct ProfileService Profile
PurposeLists a software productLists a service-based company
FocusFeatures, pricing, and reviewsExpertise, industries, and capabilities
AudienceBuyers comparing softwareBusinesses seeking IT or development partners
PricingFixed or plan-basedCustom quotes on request
ExamplesZoho CRM, QuickBooks, AsanaSystems Limited, Accenture, Wipro

Which Profile Should You Create?

Here’s how to decide which profile fits your business:

Create a Product Profile if you’re a software vendor offering a product that users can buy, try, or subscribe to.

Create a Service Profile if you’re a service-based company providing IT consulting, software development, or implementation services.

Choosing the right profile ensures your business appears in the correct category and reaches the right audience on Software Finder.


How to Contact Leads and Turn Interest Into Sales

· 4 min read

Leads are people who are actively interested in buying software. They’ve already shown intent by engaging with your category or solution, which makes them some of the most valuable contacts you can follow up with. The key is what you do next. A timely, personalized message can turn that initial interest into a real conversation. Delay too long, and you risk losing them to a competitor who acted faster.

Why Reaching Out Matters

Leads are not the same as cold prospects. They already have intent, which puts you a step ahead. Connecting with them matters because:

  • They’re actively searching for a solution like yours.
  • Quick outreach shortens the time from interest to decision.
  • Personalized contact builds trust and improves your chances of conversion.
  • If you don’t take action, another vendor likely will.

Think of each lead as someone raising their hand and saying, “I’m interested.” Reaching out is simply your way of saying, “Let’s talk.”

How to Approach Leads

The best way to connect with leads is usually by email. It’s professional, direct, and gives you the chance to explain the value of your product in a simple way. The most effective emails are short, clear, and easy for the lead to act on.

Tips for success

  • Personalize with the lead’s name, company, or role.
  • Focus on their priorities instead of just describing features.
  • Offer one clear next step, such as a demo, pricing information, or a short call.

Note: If you want to download all your leads for offline review, you can use the Export button available in the Leads section of your vendor portal.


1) Introductory Email

Introductory Email Template

Subject: Quick hello from {{CompanyName}}

Hi {{Name}},

I’m {{Your Name}} from {{CompanyName}}. I thought I’d reach out since you’re looking at {{Category}} tools. {{ProductName}} is built to help teams with {{PrimaryOutcome}}, and I’d be glad to show you how it works.

Would you be open to a quick {{15}}-minute call or demo? I can walk you through it and answer any questions.
{{Calendly/DemoLink}}

Best,
{[Your Name]}
{{Your Designation}}
{{Your Company}}

Example

Example: InsightCRM Intro

Subject: Quick hello from InsightCRM

Hi Sarah,

I’m Daniel from InsightCRM. I thought I’d reach out since you’re looking at CRM tools. InsightCRM is built to help teams improve customer retention, and I’d be glad to show you how it works.

Would you be open to a quick 15-minute call or demo? I can walk you through it and answer any questions.
→ Schedule a call

Best,
Daniel
Customer Support
InsightCRM


2) Pain Point Email

Pain Point Email Template

Subject: Struggling with {{PainPoint}}?

Hi {{Name}},

A lot of teams we talk to in {{Peer/Industry}} run into {{PainPoint}}. {{ProductName}} helps solve that by {{Result}}, usually within {{Timeframe}}.

If that’s something on your plate, I’d be happy to share how it could help at {{Company}} too.

Would you be open to a quick call to discuss?
{{Calendly/DemoLink}}

Best regards,
{[Your Name]}

Example

Example: InsightCRM Pain Point

Subject: Struggling with pipeline visibility?

Hi Michael,

A lot of teams we talk to in SaaS run into pipeline visibility challenges. InsightCRM helps solve that by giving full visibility within 30 days, without manual data entry.

If that’s something on your plate, I’d be happy to share how it could help at Acme Inc. too.

Would you be open to a quick call to discuss?
→ Schedule a call

Best regards,
Daniel


Final Thoughts

Leads represent real buying intent. They’re not random names on a list; they’re people already exploring solutions in your category. By reaching out quickly and with a message that feels relevant, you increase your chances of starting meaningful conversations.

Keep it personal, keep it simple, and always guide them toward the next step. That is how interest turns into opportunities, and opportunities turn into customers.

Why Your CTA Button Matters

· 2 min read

Have you ever clicked on a software listing that looked interesting but then wondered what to do next? You’re not alone. In today’s crowded software market, just being visible is not enough. You need to give potential buyers a clear next step to take action. That’s why having a strong Call-to-Action (CTA) is so important.In this article, we’ll explore why your CTA button matters, and a simple step-by-step guide to setting it up on my.softwarefinder.

note

Still wondering how a powerful CTA button can help your listing? Upgrade to the Premium plan and unlock this feature to start turning visitors into real leads.Try the free 14-day trial today and experience the difference!


Step-by-Step Guide to Adding a CTA Button

Follow the steps below to set up your custom CTA button on your Software Finder profile.

Step 1: Log in to your dashboard and click the "Manage" button on the profile listing where you want to set up the CTA button.

Step 2: Click the "Add a CTA Here" button, and a pop-up window will appear. If you are on the free plan, click "Start Free Trial," enter your card details, and activate your 14-day trial to access the CTA feature.

Step 3: After activating your Premium plan or if you are already subscribed, click “Add CTA Button” to open the setup window. Then choose your button title and enter the URL where you want visitors to go and click “Save” button.

Step 4: Click the "Publish Now" button to make your CTA button live on your listing.

With your CTA button now live, you’re ready to guide potential buyers toward the next step. Monitor your listing engagement and watch how a clear CTA can help increase your leads and conversions.

Conclusion

A well-designed CTA button may seem small, but it can make a big difference in how visitors engage with your Software Finder listing. By providing a clear next step, you help potential buyers move forward with confidence and increase your chances of turning interest into real opportunities.

How to Optimize the Overview Section on Software Finder

· 3 min read

First impressions count when potential buyers visit your vendor profile. The Overview section gives you a chance to quickly explain what your product does and why it matters. As per research from the Nielsen Norman Group shows that 79% of users scan content instead of reading every word. Keeping sentences short and paragraphs brief helps hold attention. That’s why a clear overview of 35 to 50 words works best to quickly show your value and guide the reader.


How to Write an Effective Overview

Writing a clear and concise overview is important to grab attention quickly. Aim for 35 to 50 words because this length lets you highlight your product’s value without overwhelming the reader. Use simple and straightforward language that anyone can understand.

Focus on these key points:

  • What does your product do? Clearly state the main function or purpose.
  • Who it’s for. Briefly mention the target audience or industry.
  • The primary benefit. Highlight what makes your product stand out or the main advantage it offers.

Avoid jargon, complex sentences, and unnecessary details.The goal is to help visitors quickly understand why your product matters and encourage them to learn more.


Step-by-Step: Update Your Overview Section

Follow the steps below to update your Overview section easily:

Step 1: Navigate to your profile page where your vendor information is displayed.

Step 2: Locate the Overview section and click the Edit icon on the right side of this section to open the editor.

Step 3: Make the necessary changes to your overview text as needed, then click the Save button to save your edits.

Step 4: Finally, click the Publish Now button to make your updated overview live on your profile.


Tips for Optimizing Your Overview Over Time

  • Test Different Versions: Try updating your overview with slightly different wording to see which version engages visitors better.
  • Use Clear and Simple Language: Avoid jargon and keep sentences short to improve readability.
  • Highlight Key Benefits: Focus on what makes your product unique and how it solves customer problems.
  • Keep it Updated: Regularly review and refresh your overview to reflect new features, services, or customer feedback.
  • Monitor Analytics: Use visitor data and feedback to understand how well your overview is performing and make adjustments accordingly.

Conclusion

A strong and clear Overview section is essential for making a great first impression on potential buyers.By keeping your overview concise, focused, and up to date, you can effectively communicate your product’s value and encourage visitors to learn more.Follow the simple steps outlined above to update your overview today and start attracting more engaged prospects to your profile.

How to Add a Product Demo Video

· One min read

A product video gives buyers a quick, visual walkthrough of your software in action. Whether it’s a demo or feature overview, video content helps explain complex functionality and increases engagement on your listing. This feature is only available to Premium users.


How to Add a Product Video

  1. Log in to your vendor account at my.softwarefinder.com.
  2. Click the Manage button next to your product.
  3. Scroll to the Video section.
  4. Click the Edit icon.
  5. Paste your YouTube video URL into the input field.
  6. Click Save, then Publish Changes at the top of the screen to embed the video.

What to Include in This Section

  • Use a YouTube-hosted video that clearly showcases your product’s features or workflow.
  • Focus on a short demo or highlight reel that helps buyers understand key functionality in under 2 minutes.
  • Ensure the content is clear, well-edited, and relevant to what’s shown in your screenshots or description.

Conclusion

Adding a product video helps buyers visualize your software in real-time and can boost confidence during their evaluation process. Keep it short, informative, and focused on your product’s actual user experience.

How to Add Product Screenshots

· One min read

Product screenshots give potential buyers a visual preview of your software’s interface and features. High-quality images help communicate value quickly and make your listing more engaging. This feature is only available for Premium users.


How to Add Product Screenshots

  1. Log in to your vendor account at my.softwarefinder.com.
  2. Click the Manage button next to your product.
  3. Scroll to the Screenshots section.
  4. Click the Edit icon.
  5. Use Browse Image or drag and drop to upload one or more screenshots (max 2 MB per file).
  6. Click Save, then Publish Changes at the top of the screen to make them live.

What to Include in This Section

  • Upload clean, high-resolution images in .PNG or .JPEG format.
  • Highlight key parts of your product: dashboards, reports, workflows, or differentiators.
  • Avoid generic images or overly edited visuals. Show real, in-product views.

Conclusion

Well-chosen screenshots help buyers visualize how your software works—making your listing more trustworthy and easier to understand. Keep the visuals focused, high quality, and representative of your actual user experience.

How to Update Your Software Specifications on Software Finder

· 2 min read

Specifications help buyers quickly understand what your product can (and cannot) do.
Selecting the right specs improves the accuracy of your listing and ensures it appears in relevant searches.Keeping this section updated builds trust and helps buyers evaluate your product more efficiently.


How to Edit the Specifications Section

  1. Log in to your vendor account at my.softwarefinder.com.
  2. Click the Manage button next to your product.
  3. Scroll to the Specifications section.
  4. Click the Edit icon.
  5. Use the sliders to enable or disable specifications based on your product’s actual features.
  6. Click Save, then Publish Changes to update your live listing.

What to Include in This Section

  • Only select specifications your product fully supports.
  • Avoid enabling features just to broaden visibility—it can mislead buyers and reduce trust.
  • Review and update this section regularly, especially after product updates or feature rollouts.

💡 Tip: Over-selecting specifications can confuse potential customers and lead to mismatched expectations.
Keep it accurate and honest.


Conclusion

Accurate specifications help your product show up in the right searches and ensure that buyers know exactly what to expect. By keeping this section focused and up to date, you’ll improve the quality of your leads and reinforce your product’s credibility.